Create a Language Understanding App
The Language Understanding service enables you to define an app that encapsulates a language model that applications can use to interpret natural language input from users, predict the users intent (what they want to achieve), and identify any entities to which the intent should be applied.
For example, a language understanding app for a clock application might be expected to process input such as:
What is the time in London?
This kind of input is an example of an utterance (something a user might say or type), for which the desired intent is to get the time in a specific location (an entity); in this case, London.
Note: The task of the language understanding app is to predict the user’s intent, and identify any entities to which the intent applies. It is not its job to actually perform the actions required to satisfy the intent. For example, the clock application can use a language app to discern that the user wants to know the time in London; but the client application itself must then implement the logic to determine the correct time and present it to the user.
Clone the repository for this course
If you have not already cloned AI-102-AIEngineer code repository to the environment where you’re working on this lab, follow these steps to do so. Otherwise, open the cloned folder in Visual Studio Code.
- Start Visual Studio Code.
- Open the palette (SHIFT+CTRL+P) and run a Git: Clone command to clone the
https://github.com/MicrosoftLearning/AI-102-AIEngineerrepository to a local folder (it doesn’t matter which folder). - When the repository has been cloned, open the folder in Visual Studio Code.
-
Wait while additional files are installed to support the C# code projects in the repo.
Note: If you are prompted to add required assets to build and debug, select Not Now.
Create Language Understanding resources
To use the Language Understanding service, you need two kinds of resource:
- An authoring resource: used to define, train, and test the language understanding app. This must be a Language Understanding - Authoring resource in your Azure subscription.
-
A prediction resource: used to publish your language understanding app and handle requests from client applications that use it. This can be either a Language Understanding or Cognitive Services resource in your Azure subscription.
Important: Authoring resources must be created in one of three regions (Europe, Australia, or US). Language Understanding apps created in European or Australian authoring resources can only be deployed to prediction resources in Europe or Australia respectively; models created in US authoring resources can be deployed to prediction resources in any Azure location other than Europe and Australia. See the authoring and publishing regions documentation for details about matching authoring and prediction locations.
If you don’t already have Language Understanding authoring and prediction resources:
- Open the Azure portal at
https://portal.azure.com, and sign in using the Microsoft account associated with your Azure subscription. -
Select the +Create a resource button, search for language understanding, and create a Language Understanding resource with the following settings.
Ensure you select Language Understanding, not Language Understanding (Azure Cognitive Services)
- Create option: Both
- Subscription: Your Azure subscription
- Resource group: Choose or create a resource group (if you are using a restricted subscription, you may not have permission to create a new resource group - use the one provided)
- Name: Enter a unique name
- Authoring location: Select your preferred location
- Authoring pricing tier: F0
- Prediction location: The same as your authoring location
- Prediction pricing tier: F0
- Wait for the resources to be created, and note that two Language Understanding resources are provisioned; one for authoring, and another for prediction. You can view both of these by navigating to the resource group where you created them. If you select Go to resource, it will open the authoring resource.
Create a Language Understanding app
Now that you have created an authoring resource, you can use it to create a Language Understanding app.
- In a new browser tab, open the Language Understanding portal at
https://www.luis.ai. -
Sign in using the Microsoft account associated with your Azure subscription. If this is the first time you have signed into the Language Understanding portal, you may need to grant the app some permissions to access your account details. Then complete the Welcome steps by selecting your Azure subscription and the authoring resource you just created.
Note: If your account is associated with multiple subscriptions in different directories, you may need to switch to the directory containing the subscription where you provisioned your Language Understanding resources.
- On the Conversation Apps page, ensure your subscription and Language Understanding authoring resource are selected. Then create a new app for conversation with the following settings:
- Name: Clock
- Culture: English (if this option is not available, leave it blank)
- Description: Natural language clock
- Prediction resource: Your Language Understanding prediction resource
If your Clock app isn’t opened automatically, open it.
If a panel with tips for creating an effective Language Understanding app is displayed, close it.
Create intents
The first thing we’ll do in the new app is to define some intents.
- On the Intents page, select + Create to create a new intent named GetTime.
-
In the GetTime intent, add the following utterances as example user input:
what is the time?
what time is it?
-
After you’ve added these utterances, go back to the Intents page and add another new intent named GetDay with the following utterances:
what is the day today?
what day is it?
-
After you’ve added these utterances, go back to the Intents page and add another new intent named GetDate with the following utterances:
what is the date today?
what date is it?
- After you’ve added these utterances, go back to the Intents page and select the None intent. This is provided as a fallback for input that doesn’t map to any of the intents you have defined in your language model.
-
Add the following utterances to the None intent:
hello
goodbye
Train and test the app
Now that you’ve added some intents, let’s train the app and see if it can correctly predict them from user input.
- At the top right of the portal, select Train to train the app.
-
When the app is trained, select Test to display the Test panel, and then enter the following test utterance:
what’s the time now?
Review the result that is returned, noting that it includes the predicted intent (which should be GetTime) and a confidence score that indicates the probability the model calculated for the predicted intent.
-
Try the following test utterance:
tell me the time
Again, review the predicted intent and confidence score.
-
Try the following test utterance:
what’s today?
Hopefully the model predicts the GetDay intent.
-
Finally, try this test utterance:
hi
This should return the None intent.
- Close the Test panel.
Add entities
So far you’ve defined some simple utterances that map to intents. Most real applications include more complex utterances from which specific data entities must be extracted to get more context for the intent.
Add a machine learned entity
The most common kind of entity is a machine learned entity, in which the app learns to identify entity values based on examples.
- On the Entities page, select + Create to create a new entity.
- In the Create an entity dialog box, create a Machine learned entity named Location.
- After the Location entity has been created, return to the Intents page and select the GetTime intent.
-
Enter the following new example utterance:
what time is it in London?
- When the utterance has been added, select the word london, and in the drop-down list that appears, select Location to indicate that “london” is an example of a location.
-
Add another example utterance:
what is the current time in New York?
- When the utterance has been added, select the words new york, and map them to the Location entity.
Add a list entity
In some cases, valid values for an entity can be restricted to a list of specific terms and synonyms; which can help the app identify instances of the entity in utterances.
- On the Entities page, select + Create to create a new entity.
- In the Create an entity dialog box, create a List entity named Weekday.
-
Add the following Normalized values and synonyms:
Normalized values synonyms sunday sun monday mon tuesday tue wednesday wed thursday thu friday fri saturday sat - After the Weekday entity has been created, return to the Intents page and select the GetDate intent.
-
Enter the following new example utterance:
what date was it on Saturday?
- When the utterance has been added, verify that saturday has been automatically mapped to the Weekday entity. If not, select the word saturday, and in the drop-down list that appears, select Weekday.
-
Add another example utterance:
what date will it be on Friday?
- When the utterance has been added, ensure friday is mapped to the Weekday entity.
Add a Regex entity
Sometimes, entities have a specific format, such as a serial number, form code, or date. You can define a regular expression (regex) that describes an expected format to help your app identify matching entity values.
- On the Entities page, select + Create to create a new entity.
-
In the Create an entity dialog box, create a Regex entity named Date with the following regex:
[0-9]{2}/[0-9]{2}/[0-9]{4}Note: This is a simple regex that checks for two digits followed by a “/”, another two digits, another “/”, and four digits - for example 01/11/2020. It allows for invalid dates, such as 56/00/9999; but it’s important to remember that the entity regex is used to identify data entry that is intended as a date - not to validate date values.
- After the Date entity has been created, return to the Intents page and select the GetDay intent.
-
Enter the following new example utterance:
what day was 01/01/1901?
- When the utterance has been added, verify that 01/01/1901 has been automatically mapped to the Date entity. If not, select 01/01/1901, and in the drop-down list that appears, select Date.
-
Add another example utterance:
what day will it be on 12/12/2099?
- When the utterance has been added, ensure 12/12/2099 is mapped to the Date entity.
Retrain the app
Now that you’ve modified ths language model, you need to retrain and retest the app.
- At the top right of the portal, select Train to retrain the app.
-
When the app is trained, select Test to display the Test panel, and then enter the following test utterance:
what’s the time in Edinburgh?
- Review the result that is returned, which should hopefully predict the GetTime intent. Then select Inspect and in the additional inspection panel that is displayed, examine the ML entities section. The model should have predicted that “edinburgh” is an instance of a Location entity.
-
Try testing the following utterances:
what date is it on Friday?
what’s the date on Thu?
what was the day on 01/01/2020?
- When you have finished testing, close the inspection panel, but leave the test panel open.
Perform batch testing
You can use the test pane to test individual utterances interactively, but for more complex language models it is generally more efficient to perform batch testing.
- In Visual Studio Code, open the batch-test.json file in the 09-luis-app folder. This file consists of a JSON document that contains multiple test cases for the clock language model you created.
- In the Language Understanding portal, in the Test panel, select Batch testing panel. Then select + Import and import the batch-test.json file, assigning the name clock-test.
- In the Batch testing panel, run the clock-test test.
- When the test has completed, select See results.
-
On the results page, view the confusion matrix that represents the prediction results. It shows true positive, false positive, true negative, and false negative predictions for the intent or entity that is selected in the list on the right.
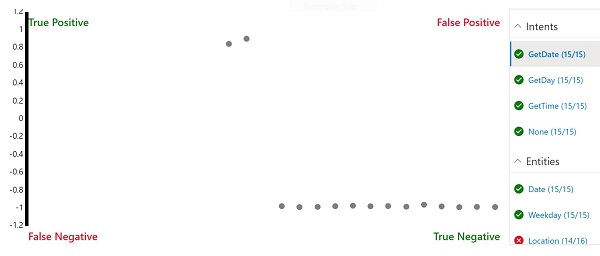
Note: Each utterance is scored as positive or negative for each intent - so for example “what time is it?” should be scored as positive for the GetTime intent, and negative for the GetDate intent. The points on the confusion matrix show which utterances were predicted correctly (true) and incorrectly (false) as positive and negative for the selected intent.
-
With the GetDate intent selected, select any of the points on the confusion matrix to see the details of the prediction - including the utterance and the confidence score for the prediction. Then select the GetDay, GetTime and None intents and view their prediction results. The app should have done well at predicting the intents correctly.
Note: The user interface may not clear previously selected points.
- Select the Location entity and view the prediction results in the confusion matrix. In particular, note the predictions that were false negatives - these were cases where the app failed to detect the specified location in the utterance, indicating that you may need to add more sample utterances to the intents and retrain the model.
- Close the Batch testing panel.
Publish the app
In a real project, you’d iteratively refine intents and entities, retrain, and retest until you are satisfied with the predictive performance. Then, you can publish the app for client applications to use.
- At the top right of the Language Understanding portal, select Publish.
- Select Production slot, and publish the app.
- After publishing is complete, at the top of the Language Understanding portal, select Manage.
- On the Settings page, note the App ID. Client applications need this to use your app.
- On the Azure Resources page, note the Primary Key, Secondary Key, and Endpoint URL for the prediction resource through which the app can be consumed. Client applications need the endpoint and one of the keys to connect to the prediction resource and be authenticated.
- In Visual Studio Code, in the 09-luis-app folder, select the GetIntent.cmd batch file and view the code it contains. This command-line script uses cURL to call the Language Understanding REST API for the specified application and prediction endpoint.
- Replace the placeholder values in the script with the App ID, Endpoint URL, and either the Primary Key or Secondary Key for your Language Understanding app; and then save the updated file.
-
Right-click the 09-luis-app folder and open an integrated terminal. Then enter the following command (be sure to include the quotation marks!):
GetIntent "What's the time?" - Review the JSON response returned by your app, which should indicate the top scoring intent predicted for your input (which should be GetTime).
-
Try the following command:
GetIntent "What's today's date?" - Examine the response and verify that it predicts the GetDate intent.
-
Try the following command:
GetIntent "What time is it in Sydney?" -
Examine the response and verify that it includes a Location entity.
-
Try the following commands and examine the responses:
GetIntent "What time is it in Glasgow?"GetIntent "What's the time in Nairobi?"GetIntent "What's the UK time?" -
Try a few more variations - the goal is to generate at least some responses that correctly predict the GetTime intent, but fail to detect a Location entity.
Keep the terminal open. You will return to it later.
Apply active learning
You can improve a Language Understanding app based on historical utterances submitted to the endpoint. This practice is called active learning.
In the previous procedure, you used cURL to submit requests to your app’s endpoint. These requests included the option to log the queries, which enables the app to track them for use in active learning.
- In the Language Understanding portal, Select Build and view the Review endpoint utterances page. This page lists logged utterances that the service has flagged for review.
- For any utterances for which the intent and a new location entity (that wasn’t included in the original training utterances) are correctly predicted, select ✓ to confirm the entity, and then use the ⤒ icon to add the utterance to the intent as a training example.
- Find an example of an utterance in which the GetTime intent was correctly identified, but a Location entity was not identified; and select the location name and map it to the location entity. Then use the ⤒ icon to add the utterance to the intent as a training example.
- Go to the Intents page and open the GetTime intent to confirm that the suggested utterances have been added.
- At the top of the Language Understanding portal, select Train to retrain the app.
- At the top right of the Language Understanding portal, select Publish and republish the app to the Production slot.
- Return to the terminal for the 09-luis-app folder, and use the GetIntent command to submit the utterance you added and corrected during active learning.
- Verify that the result now includes the Location entity. Then try another utterance that uses the same phrasing but specifies a different location (for example, Berlin).
Export the app
You can use the Language Understanding portal to develop and test your language app, but in a software development process for DevOps, you should maintain a source controlled definition of the app that can be included in continuous integration and delivery (CI/CD) pipelines. While you can use the Language Understanding SDK or REST API in code scripts to create and train the app, a simpler way is to use the portal to create the app, and export it as a .lu file that can be imported and retrained in another Language Understanding instance. This approach enables you to make use of the productivity benefits of the portal while maintaining portability and reproducibility for the app.
- In the Language Understanding portal, select Manage.
- On the Versions page, select the current version of the app (there should only be one).
- In the Export drop-down list, select Export as LU. Then, when prompted by your browser, save the file in the 09-luis-app folder.
- In Visual Studio Code, open the .lu file you just exported and downloaded (if you are prompted to search the marketplace for an extension that can read it, dismiss the prompt). Note that the LU format is human-readable, making it an effective way to document the definition of your Language Understanding app in a team development environment.
More information
For more information about using the Language Understanding service, see the Language Understanding documentation.